
After some days of hard work, not able to blog, here is my third part of the DevExpress review.
This times i focused, as promised, about integrating the WinForms TaskbarAssistant into XAF.
Cause i don't want to repeat myself here is the readme that can also be found on github. If i have time over the holidays, i try to make a screencast that explain my solution in further detail and show the little pitfalls I encountered. But, as expected, it was very easy to integrate in XAF and till now my absolute favorite of the 13.2 release. (i hate to write native calls on my own :D)
So here is the readme & happy holidays to everybody :)
Oh and before i forget: Xpand.ExpressApp.Win.Para.* will be a new part of our applications, that allows me to write and share Xpand (XAF) modules, without having to violate our internal source licence.
Greetins Manuel
The WindowsIntegrationWindowsFormsModule
Deeper Windows Integration Features to XAF/Xpand
This Module allows you to integrate the TaskbarAssistent into XAF.
Getting started
Integrate the WindowsIntegrationWindowsFormsModule like you would do with any Module.
This is a WindowsForms only Module.
Rebuild your project and you will see 2 additional nodes in the Options section:
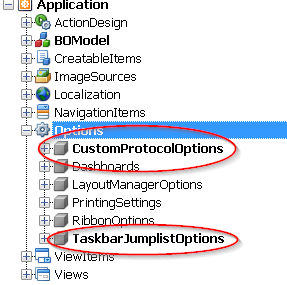
The TaskbarJumpListOptions node allows you to specify JumplistCategories and JumplistItems.
Jumplists
Set the EnableJumplist option to True and specify a argument name that will be used to launch your application with command line arguments.
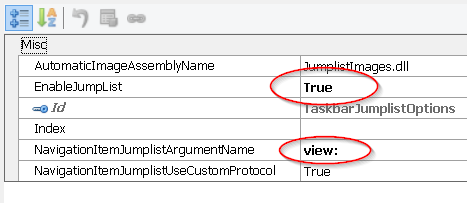
Note if you only like to launch external applications you can skip the
NavigationItemJumplistArgumentNameTheNavigationItemJumplistArgumentNameshould end with a colon.
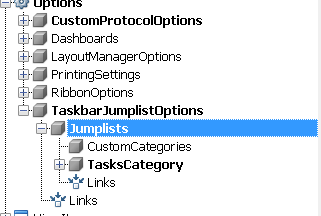
You see two nodes:
- The
CustomCategoriesnode: This allows you to specify custom categories withJumpItemsin it. - The
TasksCategoryis the default category provided by windows.
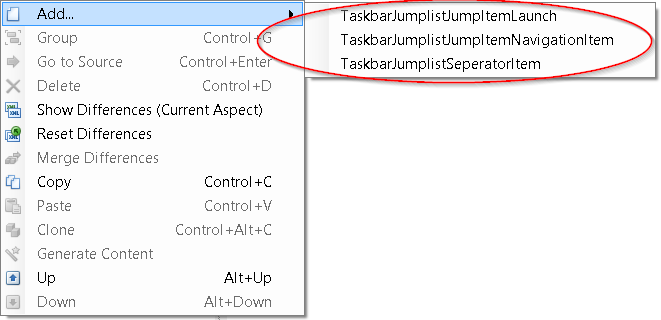
Currently there are 3 types of JumpListItems:
- The
TaskbarJumplistJumpItemLaunchallows you to specify any program that you'd like to launch. You can provide arguments and aWorkingDirectory. - The
TaskbarJumplistJumpItemNavigationItemallows you to specify aNavigationItemthe user can select from the the Jumplist. - The
TaskbarJumplistSeperatorItemis a simple seperator that draws a horizontal line.
TaskbarJumplistJumpItemLaunch
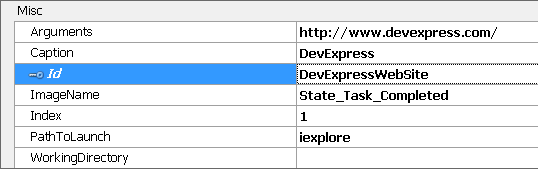
You can currently specify:
PathToLaunch: The program you like to launchArguments: The arguments that are passed to the applicationWorkingDirectory: Specifies the folder in which the program is launchedImageName: An ImageName to provide an icon for the JumpListItemCaption: The Text that is displayed to the userIndex: The order of the JumpListItemId: The Id of the item
TaskbarJumplistJumpItemNavigationItem
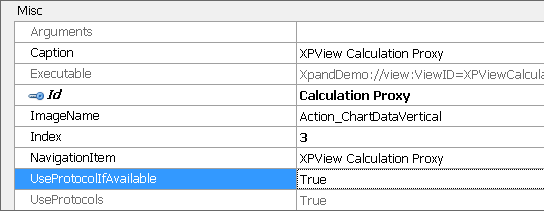
You can currently specify:
NavigationItem: Specifies the NavigationItem that should be shownUseProtocolIfAvailable: Uses the protocol handler if availableImageName: An ImageName to provide an icon for the JumpListItemCaption: The Text that is displayed to the userIndex: The order of the JumpListItemId: The Id of the item
TaskbarJumplistSeperatorItem

You can currently specify:
Index: The order of the JumpListItemId: The Id of the item
Custom Categories
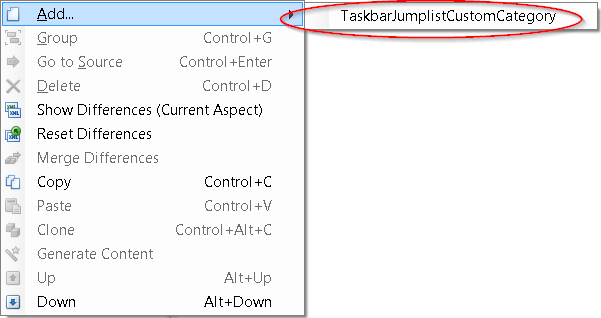

You can currently specify:
Caption: The caption of the CategoryIndex: The order of the JumpListItemId: The Id of the item
Adding new items is exact the same as for the TasksCategory.
Bootstrapping code for NavigationItemJumplistItems
static class Program
{
    private static WinApplication _Application;

    /// <summary>
    /// The main entry point for the application.
    /// </summary>
    [STAThread]
    static void Main()
    {
        var assemblyName = typeof(Program).Assembly.GetName();
        var mutexName = assemblyName.Name + "_" + assemblyName.Version.ToString(3);

#if DEBUG
        mutexName += "_Debug";
#endif
        using (var instance = new SingleInstance(mutexName))
        {
            if (instance.IsFirstInstance)
            {
                instance.ArgumentsReceived += WindowsIntegrationWindowsFormsModule.InstanceOnArgumentsReceived;

                instance.ListenForArgumentsFromSuccessiveInstances();
Specify a mutex name. This is an ordinary string, my experiance has shown that a combination of the assemblyName combined with the version of the application and a debug constant works very well for the most scenarios.
Create an instance of the SingleInstance class that manages our application instances.
Check if this is the first instance launched, attach the ArgumentsReceived event handler to the WindowsIntegrationWindowsFormsModule.InstanceOnArgumentsReceived method and call the ListenForArgumentsFromSuccessiveInstances method to listen for new arguments on the NamedPipe.
Create your application as you always would:
Application.EnableVisualStyles();
Application.SetCompatibleTextRenderingDefault(false);

_Application = new WinApplication
{
    ApplicationName = assemblyName.Name,
    SplashScreen = new DevExpress.ExpressApp.Win.Utils.DXSplashScreen()
};

_Application.CreateCustomObjectSpaceProvider += (sender, args) =>
{
    args.ObjectSpaceProvider = new XPObjectSpaceProvider(new ConnectionStringDataStoreProvider(args.ConnectionString));
};

_Application.DatabaseVersionMismatch += (sender, args) =>
{
    args.Updater.Update();
    args.Handled = true;
};

_Application.Modules.Add(new SystemModule());
_Application.Modules.Add(new SystemWindowsFormsModule());
_Application.Modules.Add(new WindowsIntegrationWindowsFormsModule());
_Application.Modules.Add(new DemoCenterModule());
_Application.Modules.Add(new DemoCenterWindowsFormsModule());
Before you start the application make sure you pass the WinApplication instance to the WindowsIntegrationWindowsFormsModule.TaskbarApplication propety:
WindowsIntegrationWindowsFormsModule.TaskbarApplication = _Application;
Then setup and launch your application
InMemoryDataStoreProvider.Register();
_Application.ConnectionString = InMemoryDataStoreProvider.ConnectionString;

try
{
    _Application.Setup();

    _Application.Start();
}
catch (Exception e)
{
    _Application.HandleException(e);
}
If the application is not the first instance pass the arguments to the first instance:
}
else
{
    instance.PassArgumentsToFirstInstance();
}
The whole bootstrapper now should look like this:
using System;
using System.Configuration;
using System.Windows.Forms;
using DevExpress.ExpressApp.SystemModule;
using DevExpress.ExpressApp.Win;
using DevExpress.ExpressApp.Win.SystemModule;
using DevExpress.ExpressApp.Xpo;
using Xpand.Demo.Para.DemoCenter.Module.Win;
using Xpand.ExpressApp.Win.Para.WindowsIntegration;

namespace Xpand.Demo.Para.DemoCenter.Win
{
    static class Program
    {
        private static WinApplication _Application;

        /// <summary>
        /// The main entry point for the application.
        /// </summary>
        [STAThread]
        static void Main()
        {
            var assemblyName = typeof(Program).Assembly.GetName();
            var mutexName = assemblyName.Name + "_" + assemblyName.Version.ToString(3);

#if DEBUG
            mutexName += "_Debug";
#endif
            using (var instance = new SingleInstance(mutexName))
            {
                if (instance.IsFirstInstance)
                {
                    instance.ArgumentsReceived += WindowsIntegrationWindowsFormsModule.InstanceOnArgumentsReceived;

                    instance.ListenForArgumentsFromSuccessiveInstances();

                    Application.EnableVisualStyles();
                    Application.SetCompatibleTextRenderingDefault(false);

                    _Application = new WinApplication
                    {
                        ApplicationName = assemblyName.Name,
                        SplashScreen = new DevExpress.ExpressApp.Win.Utils.DXSplashScreen()
                    };

                    _Application.CreateCustomObjectSpaceProvider += (sender, args) =>
                    {
                        args.ObjectSpaceProvider = new XPObjectSpaceProvider(new ConnectionStringDataStoreProvider(args.ConnectionString));
                    };

                    _Application.DatabaseVersionMismatch += (sender, args) =>
                    {
                        args.Updater.Update();
                        args.Handled = true;
                    };

                    _Application.Modules.Add(new SystemModule());
                    _Application.Modules.Add(new SystemWindowsFormsModule());
                    _Application.Modules.Add(new WindowsIntegrationWindowsFormsModule());
                    _Application.Modules.Add(new DemoCenterModule());
                    _Application.Modules.Add(new DemoCenterWindowsFormsModule());

                    WindowsIntegrationWindowsFormsModule.TaskbarApplication = _Application;

                    InMemoryDataStoreProvider.Register();
                    _Application.ConnectionString = InMemoryDataStoreProvider.ConnectionString;

                    try
                    {
                        _Application.Setup();

                        _Application.Start();
                    }
                    catch (Exception e)
                    {
                        _Application.HandleException(e);
                    }
                }
                else
                {
                    instance.PassArgumentsToFirstInstance();
                }
            }
        }
    }
}
That's it!
Custom Protocols
The custom protocol options allow you to launch your application via an custom protocol. This can be handy if you like to send a link to another workstation to open the application with a specific window. You can think about this like a normal hyperlink but this works for your machine.
Select the CustomProtocolOptions node:
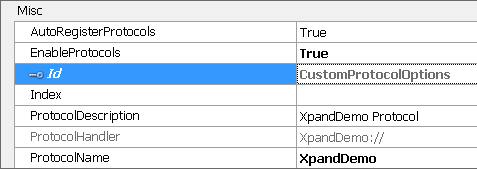
Set the EnableProtocols to True and specify a ProtolName. You see a demo of the protocol under the ProtocolHandler node.
You can currently specify:
AutoRegisterProtols: This will write the needed registry keys automatically, when the application launchesEnableProtocols: This en/disables the whole logic for protocol handlersProtocolDescription: This is a hint in the registry what this protocol doesProtoclName: The name of your protocol. This should not start with a number, dashes are allowed. See more under the microsoft documentation
Images
The Images will automatically be compiled into a new dll (based on WinApplication.UserModelDifferenceFilePath)
You can specify the name of the generated assembly via the Options.AutomaticImageAssemblyName parameter. The default leads to JumplistImages.dll.
This is necessary because windows needs a NativeResource assembly. This will be full automatically generated for all images used by your JumplistItems.
If you launch your application, windows is sometimes caching the icons in the jumplists, so you may not see the actual image you set. After a reboot (or a windows logon/logoff) your application icon should be updated.
Comments
Thank you
Your comment will appear in a few minutes.